Block
The Block command defines a block object from the selected objects and replaces the selected objects with an instance of the block.
Using blocks lets you:
- Update all instances by modifying the block definition.
- Keep a smaller model size by using block instances instead of copying identical geometry.
- Use the BlockDefinitions command to view information about the blocks defined in the model.
- Use the Insert command to place block instances into your model, which scales and rotates the instance.
Define a block
Steps:
- Select the objects.
- Pick a base point for the block.
This is the point around which the instance will be located, scaled, and rotated when it is inserted.
A block control point is placed at the base point of the block. - Set the block definition properties.
The block definition is created with the active unit system (model/layout).
Block Definition Properties
Name
The name of the block definition.
Note: Do not create blocks in a model that are named the same as the model itself.
Description
Optional descriptive information.
Hyperlink
Adds hyperlink information to a block definition. This information can be retrieved with the Hyperlink command.
Description
A description of the URL.
URL
A web address. Click the address to open the page in the default browser.
Define a block by inserting another file into a modelUse the Insert command with the Insert as option set to Block Instance. A block definition will be added to the model.
When inserting a file with the Insert command, the file's ModelBasepoint will determine how the geometry is being located in the new file.
Define a block by dragging another file onto a model1. Drag and drop a supported file from Windows Explorer onto the model.
2. Specify the Insert file option. A block definition will be added to the model.
To redefine a blockFollow the steps for defining a block and re-use the same block name.
Block Instances and Layers
The properties of the geometry (curves, surfaces, etc.) that are contained in the block instance are controlled either by the layer properties or object properties of the geometry itself. Block instances that you insert to the model insert onto the current layer and can be moved to any other layer. There is no relationship between the block instance's layer and the geometry contained in the block. For example, the block geometry does not change to match the layer color onto which the block instance is inserted.
When the block contains objects on a specific layer, turning that layer off will turn off only the objects on that layer. However, if the layer the block instance is inserted on is turned off, all of the objects will disappear.
Locking Layers
When you lock a layer, only the layer that contains the insertion point of the block instance is locked. If a block has objects that are on the locked layer, but the block instance insertion point is not on that layer, the object itself is not locked because the controlling factor is the layer of the block insertion point.
Groups
Grouped objects will not maintain their grouped status inside a block.
Properties by parent
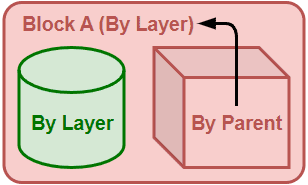
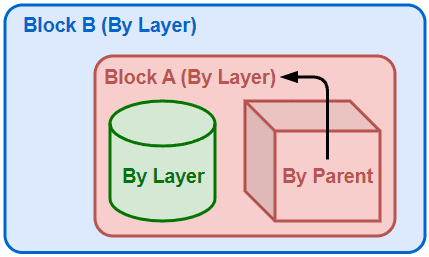
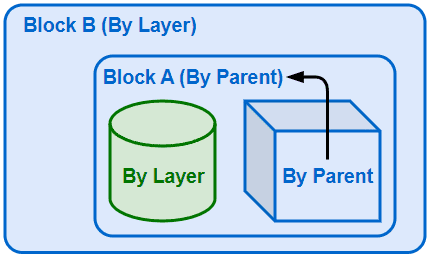
This option is only useful for objects in blocks. Think of a block instance as a container that contains objects (block members). A block instance is the parent of its block members. A block instance has its own properties. If By Parent is selected in the properties of a block member, the properties will be controlled by the block instance.
Simple block example:

Nested block example:


By Parent can be selected for Display Color, Linetype, Print Color and Print Width in object properties. For the Render material, select Use Object Parent. Render materials are only visible in Rendered and Raytraced display modes by default.
 left click