Properties: Curve Piping (Render mesh modifier)
The Curve piping properties are enabled when selecting a Curve. It constructs a render mesh pipe around a curve.
Steps:
- Select curves to apply curve piping to.
- In the Properties panel, click the Curve Piping button.
- Specify the curve piping properties.
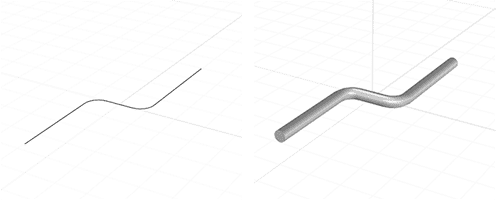 Curve with curve piping in wireframe view (left) and shaded view (right).
Note
- Curve Piping appears as a property for the curve.
- Pipes ends can be open or be capped.
- Curves inside blocks cannot be selected.
- When a curve with Curve Piping enabled, Material, Texture Mapping, Decals, and Displacement properties will be available.
Curve piping properties
On
Switches the curve piping display on and off.
Radius
The measure from the curve to the surface of the mesh pipe.
Segments
The number of mesh faces that surround the curve. For example with three segments, the cross-section of the pipe looks like an equilateral triangle. The more segments there are, the rounder the pipe is.
Faceted
Toggles between a smoothly shaded pipe and a flat-shaded pipe. This setting only affects the normals of the pipe mesh.
CapType
Assigns one of the following cap types to both ends of the pipe.
- None Leaves pipe ends open.
- Flat Plugs the pipe ends with flat caps perpendicular to the curve at each end.
- Flat, Extended Extends the pipe by length of the Radius value and plugs it with flat caps.
- Dome Plugs the pipe ends with spherical caps centered at the curve end points.
Accuracy Low / High
Changes the visual fidelity of the pipe along the curve. Higher value means that the center of the pipe is closer to the curve. By increasing the accuracy, the mesh will get more faces along the curve.
Note: Render mesh modifiers are applied in the following order: