Section
 left click
The Section command creates a clipping plane object that represents a plane for visibly clipping away geometry in specified viewports.
Insert a Clipping Plane
Steps:
- Pick two points for the opposite corners of a rectangle.
Or, select one of the options to draw the rectangle in a different way.

Clipping plane
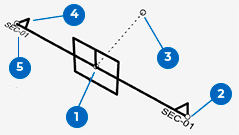
Components of a Clipping Plane widget
A Clipping Plane widget with control points turned on.
- 1. Translation point Allows moving the Clipping Plane with object snaps in a viewport that is not clipped.
- 2. Scale point Drag a scale point to re-size the widget.
- 3. Depth point Only visible when Custom Depth is enabled. The length of the dotted line is the depth distance.
- 4. Direction indicator The triangles point to the visible side of the clipping plane.
- 5. Label Shows the name of the Clipping Plane in viewports.
Notes:
- The appearance of the clipping plane edges is controlled in the display modes.
- The clipping plane is infinite. The clipping plane object represents only the location and direction of the clipping plane.
- The visibility of clipping planes is controlled with Hide, Show, and layer visibility like any other object.
- Clipping plane properties specify the clipping plane's direction and the viewports affected by the clipping plane.
- The clipping plane pointer faces toward the objects that will be visible.
Command-line options
The command-line options for the clipping plane are the same as those for drawing a Rectangle, with the addition of Custom Depth option.
CustomDepth
Clips objects beyond the depth point.
Depth
The thickness of the visible portion of a clipped object in the model units.
Properties
Clippingplane properties are displayed in the Clipping Plane tab of the Properties panel.